수년 전에 활동하던 모형 카페에 번역해서 올린 글인데, 블로그에 없어서 옮겨옵니다.
이 글은 2009년에 쓰여진 글인데 당시엔 컬러 모듈레이션 도색 기법이 막 관심을 끌던 시기였지요.
이제 보니, 글쓴이가 TANKart 시리즈 냈던 Mike Rinaldi군요. 헐. 이 글은 그 책들 나오기 이전 글입니다.
원문 링크: http://www.missing-lynx.com/articles/other/modulationmr_1.html
Ferdinand Painting, Color Modulation Style by Mike Rinaldi
Home > Articles > Other > Ferdinand Painting, Color Modulation Style Ferdinand Painting, Color Modulation Style by Mike Rinaldi Introduction Sports. We have all experienced them at some level or another, even if just as a spectator. One binding factor in
www.missing-lynx.com
Preparation
준비
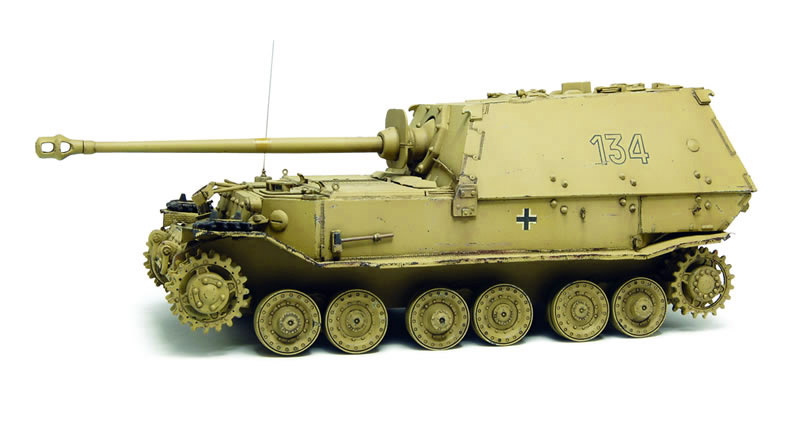
I will need a guinea pig to use for this project. Luckily, sitting on my shelf like a queen was a half-finished 1/35 Dragon Ferdinand tank destroyer. Purchased years ago already built on eBay; it wore new PE parts and came equipped with Friulmodel tracks but had enough imperfections to be a perfect choice. Its large slab-sided structure was just right, since I plan to follow along with Adam on his DVD as he paints a similar size Jagdtiger. I bought the model with the intent of repainting it, and had gone so far as to give it a new base coat and markings, as seen here:
난 이 프로젝트에 이용할 실험 대상이 필요할 것이다.
운좋게도, 내 선반에 여왕처럼 앉아있는 반쯤 끝난 1/35 드래곤 사의 '페르디난트' 탱크 디스트로이어가 있었다.
이베이에서 완성된 걸 몇년전에 샀는데, 새로운 에칭 파트와 프리울 트랙을 장착했지만, (실험 대상으로) 완벽한 선택이 되기 위해 충분한 미완성 상태였다.
DVD에서 아담이 비슷한 크기의 야크트티이거를 칠하는 것처럼 따라하려고 했기 때문에 넓고 반듯한 옆면 구조는 딱 맞았다.
난 이 모형을 재도장할 의도로 구입했고, 여기 보여지는 것처럼 새로운 베이스 도장과 마킹을 해둔 상태였다.
With the model ready to go, I collect the various paints and products necessary to make the transition to the new paint job. My primary goal was to learn, so I will use the same range of Tamiya paint colors that Adam uses on his Jagdtiger, with one minor exception. I will not pre-shade the model in gloss black prior to applying the new base coat. I regret that choice and now wish that I had, because the shadows from the black create more contrast in the end, but ultimately having that knowledge was still very useful regardless.
모형이 준비되었고, 난 새로운 도색 작업으로의 전환을 위해 필요한 다양한 도료와 제품들을 모았다.
내 첫 목표는 배우는 것이기에 경미한 하나를 제외하고는 아담이 그의 야크트티이거에서 사용하는 것과 같은 범위의 타미야 도료를 사용할 것이다.
난 모형에 새 베이스 도장을 적용하기 앞서 유광 검정으로 모형에 그림자를 미리 칠하지(pre-shade)는 않을 것이다.
난 이 선택을 후회하고, 지금은 해둘걸 바라지만, - 왜냐하면 검정으로부터 나오는 그림자는 결국에는 더 강한 대비를 만들어 주기 때문에 - 그럼에도 불구하고 궁극적으로는 얻은 지식은 여전히 매우 유용했다.
After viewing the DVD several times, I begin to understand the principles Adam was discussing and please allow me to summarize them before presenting my project. The goal of CM is to artificially enhance the model so the viewer sees more than what is really there. This is nothing new to us; figure modelers and 2D illustrators have been using this idea for years. Verlinden-era dry-brushing and even current post-shading trends dance around this same idea. But, no one has ever attempted to fully realize the 3-dimensional volumes during the painting of a military scale model. The basic processes and techniques involved are designed to enhance the 3D volumes and details of a model by playing up the balance between dark vs. light, shadow vs. highlights and so forth. Executing this goal is accomplished primarily with an airbrush by applying gradations of color to give the model more depth. This is then followed by brush painting smaller fittings in a contrasting color to illustrate their presence and enhance their appearance on the surface. To break it down even further, the fundamental theory of CM is based upon using a singular light source, and the level to which you take this idea is inherently flexible. One of the beauties of CM is that you can add a little, or a lot of it to your model. For my Ferdinand, I intend to use the full battery of techniques during the multi-step painting process.
DVD를 수차례 보고난 후에, 아담이 말하는 원리를 이해하기 시작했고, 내가 프로젝트를 시작하기 전에 그 원리들을 요약하는 것이 가능하게 되었다.
CM기법의 목적은 모형을 인공적으로 강조하여, 보는 사람으로 하여금 모형이 실제로 있는 상태보다 더 많은 것을 볼 수 있다. 이는 우리에게 새로운 것은 아니다: 피겨 모델러와 2D 일러스트레이터들은 수년간 이 아이디어를 사용해 왔다.
벨린덴 시절, 드라이 브러싱과 최근 포스트-쉐이딩 경향 조차 이 아이디어 주변에서 맴돌고 있는 것이다.
하지만, 어느 누구도 밀리터리 모형의 도색에서 입체 볼륨감을 전체적으로 구현을 시도하지는 않았다.
이 기본적인 과정과 도입된 기법은 모형의 입체 볼륨감과 디테일을 강조하기 위해 암부(暗部)와 명부(明部), 그림자와 조명받는 곳 등등 간의 밸런스를 조정함으로 설계된다.
이 목표의 실천은 일차적으로 모형에 깊이를 주기 위해 색의 그라데이션을 에어브러싱 함으로 수행된다.
그리고, 현실감을 그려내고, 표면의 외관을 강조하기 위해 색을 대비시키는 것으로 작은 부분들은 붓으로 칠하는 과정이 이어진다.
더 나아가서는, CM기법의 기초적인 이론은 단일 광원을 사용한다는 점이고, 당신이 이 아이디어를 구현할 레벨은 유동적이다.
CM기법의 아름다움 중 하나는, 아주 조금 혹은 아주 많이 이 기법을 모형에 적용할 수 있다는 것이다.
내 페르디난트에 대해서는, 난 다단계 도색 과정 동안 모든 기법을 사용해볼 생각이다.
So let’s take a look at how this study in painting turned out…
자, 이제 어떻게 이 도색 연구가 나타내어질지 들여다 보자.
===========================================================
참고:
CM 기법: Color Modulation 기법
날림 직역이기에, 번역이 이해 안 되는 부분을 말씀해주시면 적당한 선에서 의역해드리겠습니다.
매일 한 파트씩 해도 2주 정도 걸리겠군요. 흠...
[번역] Ferdinand Painting, Color Modulation Style
4. 상세 파트 변조 (Detail Modulation)
5. 유화 물감으로 디테일 강조하기 (Enhancing Detail with Oil Paints)
6. 유광 클리어와 클리어 옐로우 (Clear Gloss and Yellow)
9. 헤어 스프레이의 빠른 레이어 (Quick Layer of Hair Spray)
10. 모형을 더럽힐 시간 (Time to Get the Model Dirty)
'아무거나 만들기 製作 Maker > 참고 자료' 카테고리의 다른 글
| [번역] Ferdinand Painting, Color Modulation Style - 4. 상세 파트 변조 (Detail Modulation) (0) | 2020.03.03 |
|---|---|
| [번역] Ferdinand Painting, Color Modulation Style - 3. 에어브러싱 단계 (0) | 2020.02.27 |
| [번역] Ferdinand Painting, Color Modulation Style - 1. 서문 (0) | 2020.02.25 |
| [번역] 색상과 스케일 효과 (0) | 2020.02.21 |
| [ITARELI] 1/24 Guard rail and road section for display (0) | 2012.09.25 |